Help Center
Help Center
  • Getting Started
    • What is Haystack?
    • Quick Start
      • Account Setup
      • Roles
        • For Executives
        • For Managers
        • For Product
  • Setup
    • Integrations
      • Jira
      • GitHub Cloud
      • GitHub Enterprise
      • GitLab
      • Bitbucket
      • Slack
    • Organization
      • Investments
      • Deployments
      • Invite users
      • Exclusions
    • Teams
      • Map members
      • Sprint success metric
      • Capacity
      • Alerts
      • SLAs
      • Risks
  • Features
    • Issues
    • Pull Requests
    • Epics
    • Retrospective
    • Release Notes
    • Investments
    • Alerts
    • Customizable Widgets
    • Flexible Reports
    • Team Metrics
    • List of All Metrics
    • API
    • Embedded reports
  • Admin
    • Security & Privacy
    • Data Sync
      • How to setup faster data sync for JIRA?
  • FAQ
    • Can I track Dora metrics?
    • What is Status Category?
  • Guides
    • First Principles of Engineering Metrics
    • Engineering Metrics (Video Series)
    • How to Improve Quality?
    • Sprint Planning
    • Daily Standups
    • Retrospectives
    • Identify Bottlenecks
  • Other
    • Changelog
Powered by GitBook
On this page
  • For GitLab integrations, there are 3 high level steps
  • 1. Generate Personal Access Token
  • 2. Complete Filling Out Information on Haystack
  • 3. (Only self-managed) Open GitLab firewall to Haystack IPs

Was this helpful?

  1. Setup
  2. Integrations

GitLab

Last updated 1 year ago

Was this helpful?

See all your teams work from JIRA issues to pull requests in once place by integrating Github with Haystack.

For more information on what data Haystack uses from Gitlab,

For GitLab integrations, there are 3 high level steps

  1. Generate Personal Access Token

  2. Provide Access Token to Haystack

  3. (Only self-hosted) Open GitLab firewall to Haystack IPs

You can find detailed instructions on each step below.

1. Generate Personal Access Token

You can as you like from your GitLab profile.

  1. Log in to GitLab.

  2. In the upper-right corner, click your avatar and select Settings.

  3. On the User Settings menu, select Access Tokens.

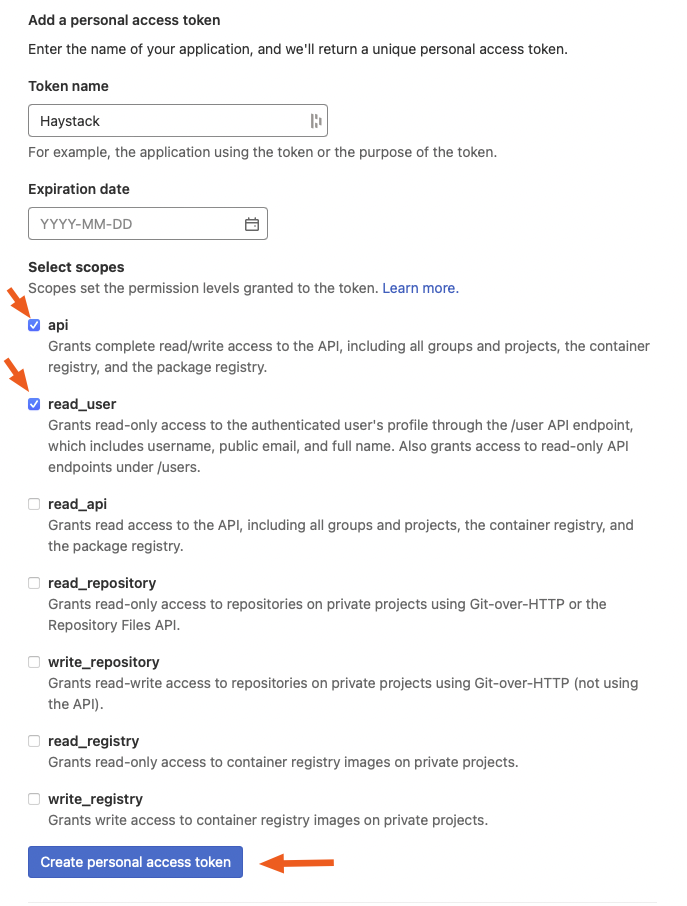
  4. Choose a name and optional expiry date for the token - Don't set any date.

  5. Choose the desired scopes - For Haystack we need only api scope and read_user scope..

  6. Click the Create personal access token button.

  7. Save the personal access token somewhere safe. Once you leave or refresh the page, you won’t be able to access it again.

Here is the example:
2. Complete Filling Out Information on Haystack
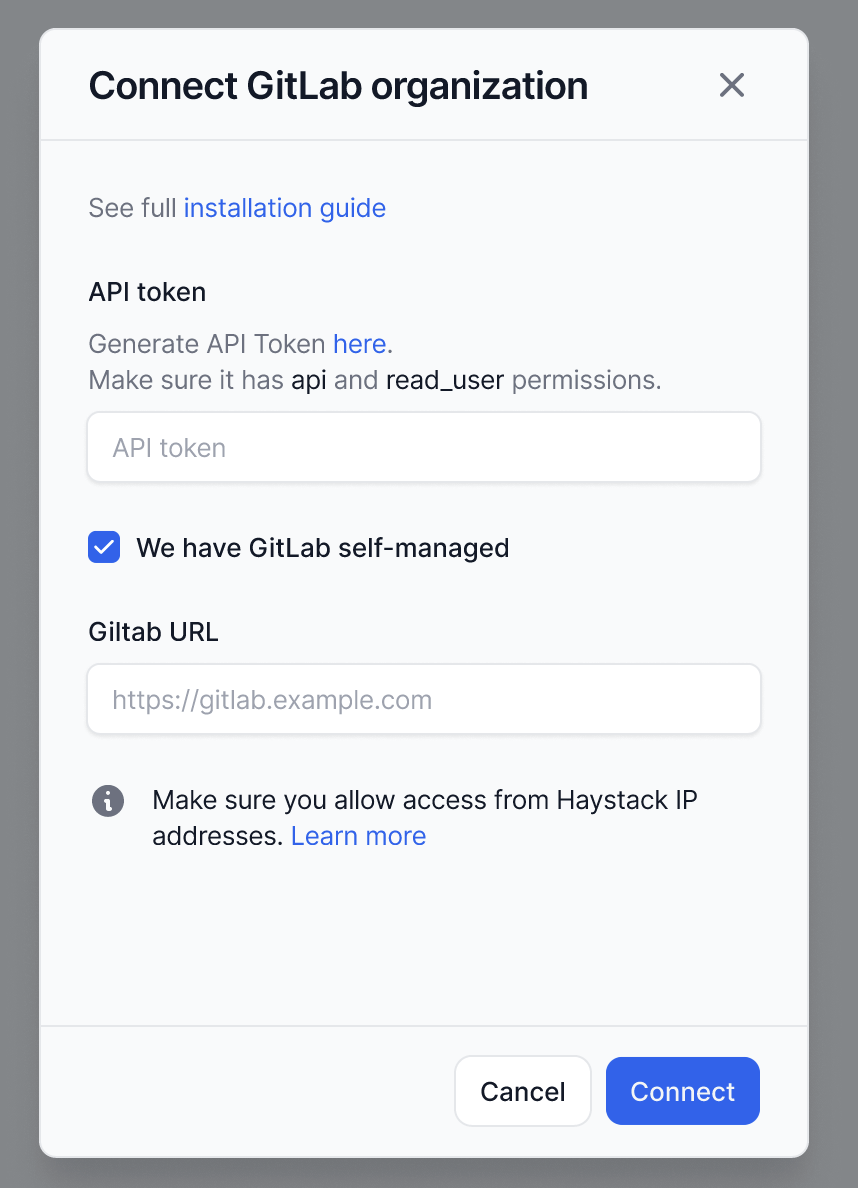
Copy paste the newly generated token into Haystack.

Click "Connect" and you are all done if you are not using a self managed Gitlab instance.

If you have a self managed Gitlab instance, please continue reading.

3. (Only self-managed) Open GitLab firewall to Haystack IPs

If you have a self managed Gitlab instance, you will need to open firewall access to the following IP addresses Haystack uses to connect to GitLab.

35.209.159.249
35.208.83.132
35.208.18.170
35.209.170.63
here is an article!
create as many personal access tokens
Page cover image